I’ve found collecting great data is a lot more important than using the latest architecture when you’re trying to get good results in deep learning, so ever since my Jetpac days I’ve spent a lot of time trying to come up with good ways to refine my training sets. I’ve written or used a lot of different user interfaces custom designed for this, but surprisingly I’ve found that the stock Finder window in OS X has been the most productive!
Here is how I curated the flowers set of images that’s used in TensorFlow for Poets, and I’ve found I can sort through many thousands of images an hour using this approach.
- Copy and decompress the images onto a folder on my OS X machine.
- Open the folder in the OS X Finder app, the normal file viewer.
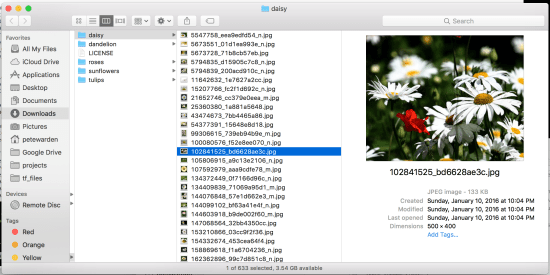
- Choose the ‘Column’ view for the Finder window, which is an icon in the top bar, the third from the left in the view choices.
- Select the first image. You should now see a small preview picture in the right-hand column.
- Move the mouse pointer over the right-hand edge of the window, until you see the cursor change into a ‘drag left/right’ icon.
- Drag the right-hand side of the Finder window out. You should see the image preview get larger. Stop once the preview size is no longer growing.
You should now have a window that looks like the image at the start of the post. There are a couple of ways of using this view. If I have a set of images that have been roughly sorted, but I want to do some quality control by weeding out pictures that are misclassified, I’ll use the up and down arrow keys to move through the images, look at each preview to quickly tell if it’s correct, and press the Command and Delete keys to remove it if not. After removing a photo, the selection automatically moves onto the next image, which is convenient.
If I have a large set of photos I want to label as belonging to a set of categories, rather than just rejecting bad labels, then I’ll use a slightly more involved approach. The key is to use “Tags” in OS X (which used to be called labels). You can follow these instructions for setting up a keyboard shortcut to open the Tags menu for an item, and then move through the files using the down keys, assigning tags as you go. Unfortunately OS X removed the ability to apply particular tags through a single keyboard shortcut, which used to be possible in older versions of the system, but this can still be an efficient way to label large sets of images.
Another approach I sometimes use to very quickly remove a small number of bad labels is to open a folder of images using the Icon view in the finder, and then crank up the preview size slider in the bottom right corner of the window. You may have to select “View->Arrange By->Name” from the top menu to ensure that the enlarged icons all fit inside the window.
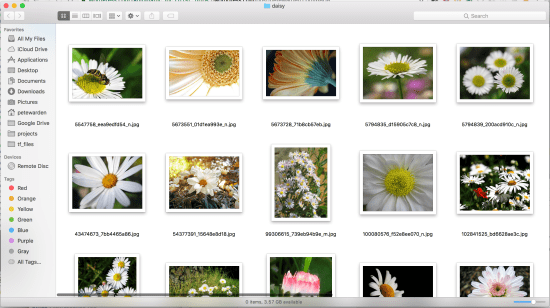
I don’t find this as efficient for moving through every image as the column view, but if I want to quickly visually scan to find a few rogue images it’s very handy. I’ll usually just grab the scroll bar at the right hand side, or use mouse scroll to quickly look through the entire data set, and then click to select any that I want to remove.
What I like about these approaches are that they are very lightweight, I don’t need to install any special software, and the speed of the preview loading in the Finder beats any custom software that I’ve found, so I can run through a lot of images very fast. Anyway, I hope you find them useful too, and do let me know your favorite labeling hacks in the comments or on Twitter.

I use the tags method, with a couple of tricks.
One is to order your items and multi-select from the bottom of finder UP.
This way you can choose a tag with the keyboard shortcut AND see the
images you are selecting in the Mac OS Finder image carousel.
If for example,
you are tagging images as “Rain” – you will see the images scroll by as you
select up. Now you can stop on a non-Rain image, and label the whole set.
For whatever reason, if you use the down arrows, the initial
image won’t move, so you won’t be able to see the first “non-rain” image
as you select down. Select UP. 🙂
Also, once you have the tags, you can use a this: https://github.com/jdberry/tag
to manipulate the tagged images from the command line.
Pingback: 1 – How to Label Images Quickly
Pingback: How to deliver on Machine Learning projects – Insight Data – Hire DB: Candidate Sourcing