A few months ago I started updating TensorFlow Lite Micro for the Raspberry Pi Pico board, which uses the RP2040 microcontroller. I ran into some baffling bugs that stopped me making progress, but eventually I tracked them down to my poor understanding of the memory layout. Since I had to do a deep dive, I wanted to share what I learned here.
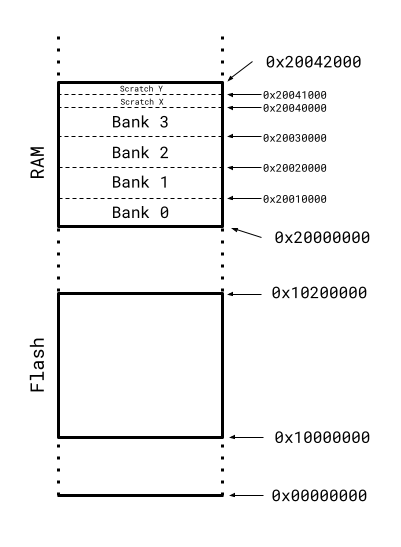
This diagram shows the physical address layout of the RP2040. I believe the flash location can be board-specific, but on the Pico boards it begins at 0x10000000 and is two megabytes long. Where things get a bit more complex is the RAM. The RP2040 has built-in SRAM, made up of four 64KB banks, followed by two 4KB banks. There isn’t much documentation I can find about the characteristics of these banks, but from what I can gather different banks can be accessed at the same time by the two Cortex M0 cores on the chip. I believe if the same bank is accessed by both cores one of the cores will stall for at least a cycle while the other is given access.
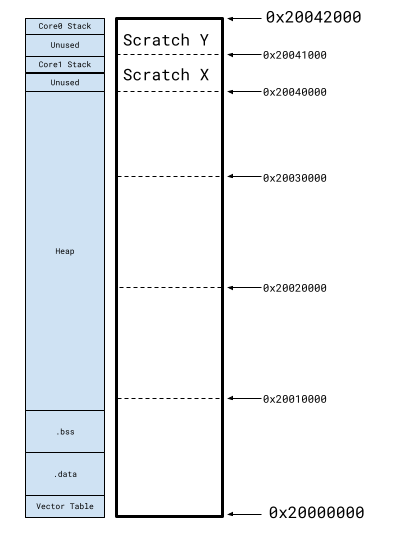
The physical layout is fixed and controlled by the hardware, but the compiler and linker decide how the software is going to use the available address space. The default RAM layout is defined in src/rp2_common/pico_standard_link/memmap_default.ld in the Pico SDK, and I’ve used those values for the diagram above. To explain some of the labels, the vector table is a 256 byte array of function pointers for system routines, and is usually at the start of RAM, .data is where all the global and static variables that start with a value are stored, .bss is the same, but for variables that don’t need to be initialized, the heap is where malloc-ed memory comes from, and the two stacks hold local variables for functions.
There are a few things to be aware of here. There are two stacks, one for each of the Cortex M0 cores the RP2040 has. Unless your program explicitly calls the second core, only core 0 will be used, so the core 1 stack is often unused. The stacks are defined as 2kb in size, and they grow downwards in this diagram, starting with the highest address as the top of the stack and moving to smaller addresses as more items are added. For performance reasons, each core’s stack is defined in a different bank, one of the smaller scratch x or y areas, presumably so that local variables can be accessed independently by each core, with no risk of stalls. One oddity is that each stack is 2KB, but the scratch banks are 4kb each, and so they each only use half of the bank.
The heap size is defined to be the remaining memory once all the other fixed-size sections have been allocated. This means it stretches from the top of .bss to the bottom of the core 1 stack. In theory there’s no mandated way for areas to be allocated from this region when you call malloc(), but in practice every implementation I’ve seen will begin allocating at the bottom (lowest address) of the heap, and move upwards as more space is needed for further allocations.
To recap, the stacks grow downwards from the highest addresses in memory, and the allocated parts of the heap grow upwards. This means that the area immediately below the stacks is unlikely to be used unless you’re heavily allocating memory from the heap. The subtle consequence of this is that you will probably not observe incorrect behavior in most programs if you end up using more than 2kb of stack space. The memory at the top of the heap is unlikely to be used, so the stack can start stomping all over it without any apparent bugs surfacing, up until the point that it reaches part of the heap that has been allocated.
So, the nominal limit for stack size on the RP2040 is 2KB, but we can definitely use 4KB (because that’s the size of the scratch bank), and in all likelihood many programs will appear to work correctly even if they use a lot more. This is important because most programs designed for non-embedded platforms assume that the stack size is on the order of megabytes at least. Even some libraries aimed at embedded systems assume at least tens of kilobytes of memory is available. In this case, it was my baby, TensorFlow Lite Micro, that had these buried assumptions.
My quest started when I saw a particular convolution test fail when I enabled my dual-core optimizations. After a lot of debugging, I realized that the test function was allocating several multi-kilobyte arrays as local variables on the stack. This blew out the 2kb nominal limit, and the 4kb practical limit for the stack size, but didn’t cause any visible problems because the heap was not heavily used. However, if you look at the RAM layout diagram above, you’ll see that the core 1 stack is immediately below the core 0 stack. This means that a core 0 function that overflows its stack size will start using memory reserved for the core 1 stack! This caused me a lot of confusion until I figured out what was going on, and I want to flag this as something to watch out for if anyone else is working on dual-core RP2040 optimizations. It meant that there were weird race conditions that meant apparently random data would end up in the data arrays, depending on which core wrote to those locations first.
Thanks to the great community on the RPi forums I was able to come up with a simple solution for my immediate problem, by putting the core 0 stack below the core 1 stack in the memmap_default.ld file (placing core 0 in scratch x, and core 1 in scratch y) since I controlled all the code running on core 1 and could ensure it wouldn’t overflow the stack, whereas core 0 ran application code that I couldn’t control. This allowed core 0’s stack to overflow into the heap, but left core 1’s stack untouched. I also learned a few helpful techniques from the forum thread, such as running -fstack-usage to get the stack size of functions and the ‘USE_STACK_GUARDS’ macro that can check for overflows. I haven’t figured out how to specify a custom .ld file in cmake yet, but I hope to add that in the future.
I hope this brain dump of what I learned about the RP2040’s memory layout and the potential for silent stack overflows helps somebody else out there. It was one of the most elusive bugs I’ve chased in quite a while, but it was very satisfying to finally understand what was going on. One of the reasons that I enjoy working on embedded platforms is that they are small enough systems that it should be possible to figure out any unexpected behavior, but this one tested my faith in that idea!


Hi, is the top address, 0x20041800, correct please? Given the address below it is 0x20440000 the top address appears incorrect.
Thanks for spotting that error! I just double checked and some of the other addresses had typos too, so I’ve uploaded new diagrams. I appreciate your help, and sorry for any confusion.
No probs. Have a good one
You triggered a tangent thought…
Decimal numbers are made easier to read, by adding a comma for every 3 zeroes (yes, I know some countries flip commas and decimal point symbols)
Is there a similar option for hexadecimal? I know some hex editors add a space between every 2 digits, helping to group data as bytes. Reading all the zeroes in your diagrams leaves me wanting to at least have a colon: between every 4 digits, to avoid confusion.
What a Great debugging note!
Just pointing out that the 4 64-kB SRAM banks are not consecutive in address space 0x20000000~0x20040000. They are arranged intermittently e.g.
0x20000000 in bank0
0x20000004 in bank1
0x20000008 in bank2
0x2000000C in bank3
etc
There’s another mirrored or aliased address space 0x21000000~0x21040000 that puts 4 banks consecutively. Namely bank 0 in 0x21000000~0x21010000, etc
Thanks, that’s very helpful! Is there any documentation with this information I can link to as well?
Absolutely. This is well documented in RP2040 datasheet which can be found in https://www.raspberrypi.com/products/rp2040/specifications/
Check chapter 2.6.2. SRAM for more information.
In most cases, this wouldn’t pose a significant issue, even when dealing with DMA. However, it becomes a concern when utilizing the second core or engaging in heavy memory operations while using DMA. In these cases, which all involve more than one bus master, efficiency will be lower since the SRAM controller can only respond to one bus master at a time, as stated in the datasheet.