In TensorFlow for Poets, I showed how you could train a neural network to recognize objects using your own custom images. The next step is getting that model into users’ hands, so in this tutorial I’ll show you what you need to do to run it in your own iOS application.
I’m assuming you’ve already completed TensorFlow for Poets, and so you should have Docker installed and a tf_files folder in your home directory that contains a retrained_graph.pb file containing your model. If you don’t, you’ll need to work through that example to build your own network.
You’ll find the screencast to accompany this tutorial above, or at https://www.youtube.com/watch?v=_bkZPpniYdo, which should help clarify the steps I’ll be walking you through.
As a first step, open the Docker QuickStart Terminal and start a new docker container using the latest Docker image. This tutorial relies on some newer features of TensorFlow, so the v0.8 image used for the original TF for Poets won’t work.
docker run -it -p 8888:8888 -v $HOME/tf_files:/tf_files \
tensorflow/tensorflow:nightly-devel
You should find yourself in a new shell where the prompt begins with root@ and ends with a ‘#’, indicating you’re running inside the Docker image. To make sure things are setup correctly, run this `ls -lah /tf_files/` and make sure that the retrained_graph.pb file appears.
Next, we’re going to make sure that the model is producing sane results at the start. Here I’m using the default flower images to test, but if you have trained on custom categories substitute the image file with one of your own. The compilation process may take a few minutes too, so make sure that you have updated the VirtualBox settings to take advantage of your machine’s memory and processors if things are running too slowly.
cd /tensorflow/
bazel build tensorflow/examples/label_image:label_image
bazel-bin/tensorflow/examples/label_image/label_image \
--output_layer=final_result \
--labels=/tf_files/retrained_labels.txt \
--image=/tf_files/flower_photos/daisy/5547758_eea9edfd54_n.jpg \
--graph=/tf_files/retrained_graph.pb
This should hopefully produce a sensible top label for your example, in the case of flowers with daisy at the top. We’ll be using this command to make sure we’re still getting sensible results as we do further processing on the model file to prepare it for use in a mobile app.
Mobile devices have limited amounts of memory, and apps need to be downloaded, so by default the iOS version of TensorFlow only includes support for operations that are common in inference and don’t have large external dependencies. You can see the list of supported ops in the tensorflow/contrib/makefile/tf_op_files.txt file. One of the operations that isn’t supported is DecodeJpeg, because the current implementation relies on libjpeg which is painful to support on iOS and would increase the binary footprint. While we could write a new implementation that uses iOS’s native image libraries, for most mobile applications we don’t need to decode JPEGs because we’re dealing directly with camera image buffers.
Unfortunately the Inception model we based our retraining on includes a DecodeJpeg operation. We normally bypass this by directly feeding the Mul node that occurs after the decode, but on platforms that don’t support the operation you’ll see an error when the graph is loaded, even if the op is never called. To avoid this, the optimize_for_inference script removes all nodes that aren’t needed for a given set of input and output nodes.
The script also does a few other optimizations that help speed, such as merging explicit batch normalization ops into the convolutional weights to reduce the number of calculations. Here’s how you run it:
bazel build tensorflow/python/tools:optimize_for_inference
bazel-bin/tensorflow/python/tools/optimize_for_inference \
--input=/tf_files/retrained_graph.pb \
--output=/tf_files/optimized_graph.pb \
--input_names=Mul \
--output_names=final_result
This creates a new file at /tf_files/optimized_graph.pb. To check that it hasn’t altered the output of the network, run label_image again on the updated model:
bazel-bin/tensorflow/examples/label_image/label_image \
--output_layer=final_result \
--labels=/tf_files/retrained_labels.txt \
--image=/tf_files/flower_photos/daisy/5547758_eea9edfd54_n.jpg \
--graph=/tf_files/optimized_graph.pb
You should see very similar results to the first time you ran label_image, since the underlying mathematical results should be preserved through the changes made to streamline it.
The retrained model is still 87MB in size at this point, and that guarantees a large download size for any app that includes it. There are lots of ways to reduce download sizes, and I’ll cover those in more detail in other documentation, but there’s one very simple approach that’s a big help without adding much complexity. Because Apple distributes apps in .ipa packages, all of the assets are compressed using zip. Usually models don’t compress well because the weights are all slightly different floating point values. You can achieve much better compression just by rounding all the weights within a particular constant to 256 levels though, while still leaving them in floating-point format. This gives a lot more repetition for the compression algorithm to take advantage of, but doesn’t require any new operators and only reduces the precision by a small amount (typically less than a 1% drop in precision). Here’s how you call the quantize_graph script to apply these changes:
bazel build tensorflow/tools/quantization:quantize_graph
bazel-bin/tensorflow/tools/quantization/quantize_graph \
--input=/tf_files/optimized_graph.pb \
--output=/tf_files/rounded_graph.pb \
--output_node_names=final_result \
--mode=weights_rounded
If you look on disk, the raw size of the rounded_graph.pb file is the same at 87MB, but if you right-click on it in the finder and choose “Compress”, you should see it results in a file that’s only about 24MB or so. That reflects what size increase you’d actually see in a compressed .ipa on iOS, or an .apk on Android.
To verify that the model is still working, run label_image again:
bazel-bin/tensorflow/examples/label_image/label_image \
--output_layer=final_result \
--labels=/tf_files/retrained_labels.txt \
--image=/tf_files/flower_photos/daisy/5547758_eea9edfd54_n.jpg \
--graph=/tf_files/rounded_graph.pb
This time, I would expect that the results may have slightly more noticeable changes thanks to the effects of the quantization, but the overall size and order of the labels should still be the same.
The final processing step we need to run is memory mapping. Because the buffers holding the model weight values are 87MB in size, the memory needed to load these into the app can put a lot of pressure on RAM in iOS even before the model is run. This can lead to stability problems as the OS can unpredictably kill apps that use too much memory. Fortunately these buffers are read-only, so it’s possible to map them into memory in a way that the OS can easily discard them behind the scenes when there’s memory pressure, avoiding the possibility of those crashes.
To support this, we need to rearrange the model so that the weights are held in sections that can be easily loaded separately from the main GraphDef, though they’re all still in one file. Here is the command to do that:
bazel build tensorflow/contrib/util:convert_graphdef_memmapped_format
bazel-bin/tensorflow/contrib/util/convert_graphdef_memmapped_format \
--in_graph=/tf_files/rounded_graph.pb \
--out_graph=/tf_files/mmapped_graph.pb
One thing to watch out for is that the file on disk is no longer a plain GraphDef protobuf, so if you try loading it into a program like label_image that expects one, you’ll see errors. You need to load the model file slightly differently, which we’ll show in the iOS example below.
So far we’ve been running all these scripts in Docker, since for demonstration purposes it’s a lot easier to run scripts there, because installing the Python dependencies is a lot more straightforward on Ubuntu than OS X. Now we’re going to switch to a native terminal so that we can compile an iOS app that uses the model you’ve trained.
You’ll need Xcode 7.3 or later with the command line tools installed to build the app, which you can download from Apple. You’ll also need brew, and automake to run the build script. To install it using brew, run this command:
brew install automake
Once you have those, open up a new terminal window, download the TensorFlow source (using `git clone https://github.com/tensorflow/tensorflow`) to a folder on your machine (replacing `~/projects/tensorflow` below with that location) and run the following commands to build the framework and copy your model files over:
cd ~/projects/tensorflow
tensorflow/contrib/makefile/build_all_ios.sh
cp ~/tf_files/mmapped_graph.pb \
tensorflow/contrib/ios_examples/camera/data/
cp ~/tf_files/retrained_labels.txt \
tensorflow/contrib/ios_examples/camera/data/
open tensorflow/contrib/ios_examples/camera/camera_example.xcodeproj
Check the terminal to make sure that your compilation succeeded without errors, and then you should find the camera example project opened in Xcode. This app shows a live feed of your camera, together with the labels for any objects it has recognized, so it’s a good demo project for testing out a new model.
The terminal commands above should have copied the model files you need into the apps data folder, but you still need to let Xcode know that it should include them in the app. To remove the default model files, go to the left-hand project navigator pane in Xcode, select imagenet_comp_graph_label_strings.txt and tensorflow_inception_graph.pb in the data folder, and delete them, choosing “Move to Trash” when prompted.
Next, open a Finder window containing the new model files, for example from the terminal like this:
open tensorflow/contrib/ios_examples/camera/data
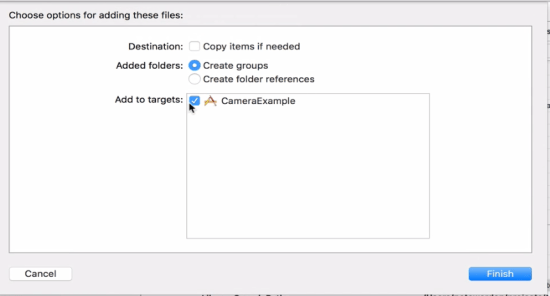
Drag `mmapped_graph.pb` and `retrained_labels.txt` from that Finder window, into the data folder in the project navigator. Make sure the “Add to Targets” is enabled for CameraExample in the dialog’s checkbox. This should let Xcode know that it should include the files when you build the app, so if you see later errors about missing files, double-check these steps.
We’ve got the files in the app, but we also need to update some other information. We need to update the name of the files to load, but also some other metadata about the size of the input images, the node names, and how to scale the pixel values numerically before feeding them in. To make those changes open CameraExampleViewController.mm in Xcode, and look for the model settings near the top of the file. Replace them with the following block:
// If you have your own model, modify this to the file name, and make sure
// you've added the file to your app resources too.
static NSString* model_file_name = @"mmapped_graph";
static NSString* model_file_type = @"pb";
// This controls whether we'll be loading a plain GraphDef proto, or a
// file created by the convert_graphdef_memmapped_format utility that wraps a
// GraphDef and parameter file that can be mapped into memory from file to
// reduce overall memory usage.
const bool model_uses_memory_mapping = true;
// If you have your own model, point this to the labels file.
static NSString* labels_file_name = @"retrained_labels";
static NSString* labels_file_type = @"txt";
// These dimensions need to match those the model was trained with.
const int wanted_input_width = 299;
const int wanted_input_height = 299;
const int wanted_input_channels = 3;
const float input_mean = 128.0f;
const float input_std = 128.0f;
const std::string input_layer_name = "Mul";
const std::string output_layer_name = "final_result";
Finally, plug in and select your iOS device (this won’t run on the simulator because it needs a camera) and hit Command+R to build and run the modified example. If everything has worked, you should see the app start, display the live camera feed, and begin showing labels from your training categories.
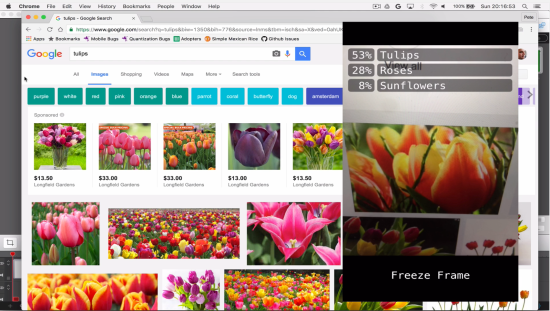
To test it out, find an example of the kind of objects you’re trying to recognize, point the camera at it and see if it is able to give it the right label. If you don’t have any physical objects handy, try doing an image search on the web, and then point it at your computer display. Congratulations, you’ve managed to train your own model and run it on a phone!
As next steps, a lot of the same transformations can be used on Android or for the Raspberry Pi, and for all sorts of other models available in TensorFlow for everything from natural language processing to speech synthesis. I’m excited to see new apps emerge using the incredible capabilities of deep learning on device, so I can’t wait to see what you come up with!

Great post peter,
One question: will this run on swift, using bridging or any other methods, or does it require a 100% objective C project?
Thanks for a great post. I am running into an issue with building the app on macos -sierra. Have posted this on stackoverflow.
http://stackoverflow.com/questions/39986749/error-in-building-tensorflow-example-ios-code-on-mac-os-sierra
I found the solution to the aforementioned issue here:
https://github.com/tensorflow/tensorflow/issues/4640
Was able to run the example successfully
Pingback: TensorFlow for mobile poets – Cloud Data Architect
Thank you for nice tutorial! So far I have tried to retrain inception v3 model and use it in Android app which takes about 10 seconds to make predictions. Is the latency on iPhone any lower?
If you’re using Bazel, try adding –android_cpu=armeabi-v7a to the command line. I just realized there’s a bug that’s preventing NEON from being enabled with that build approach.
Thanks Pete!
running build command with suggested parameter indeed significantly improved the performance. Actually, it takes around 10 seconds if retrained model is directly used. Then, after running command optimize_for_inference, the time was reduced to around 3 – 5 seconds. Then, by running bazel build -c opt –android_cpu=armeabi-v7a tensorflow/examples/android:tensorflow_demo, the detection time dropped to around 1.5 – 2.5 s.
Hello and thank you for the steps.
I use android studio(gradle+bazel) and a LG G4 to test my model.
Predictions takes about 6.5 sec delay.
I have those on my build.gradle:
def bazel_location = ‘/home/lef/bin/bazel’
def cpuType = ‘armeabi-v7a’
def nativeDir = ‘libs/’ + cpuType
I tried 3 different models:
One with -> python/tools/strip_unused
One with -> python/tools/optimize_for_inference
And one with -> quantization/quantize_graph (after optimize)
All the above have 6.5 sec delay between predictions.
Original imagenet graph runs fast and smooth.
Is there anything else that i can try to reduce delay?
Thanks a lot
What phone are you using? On iPhone 6s it goes 2-3 fps…
Pingback: 在安卓上运行TensorFlow
Great post! Is mmapped graph accuracy better than the accuracy of the inception v1 graph fine-tuned on the same training set? (Inception v1 is the graph used in Android and iOS examples on Tensorflow github repository)
Thanks a lot for the tutorial, super interesting. I’ve followed along and everything worked fine but when I’m running the app on the phone no labels are appearing… There are some errors messages in Xcode’s console (sorry it’s a bit long)
——————–
2016-11-09 00:25:39.725551 CameraExample[11960:4661788] 0x174148140 Copy matching assets reply: XPC_TYPE_DICTIONARY { count = 2, transaction: 0, voucher = 0x0, contents =
“Assets” => : { length = 1229 bytes, contents = 0x62706c6973743030d4010203040506646558247665727369… }
“Result” => : 0
}
2016-11-09 00:25:39.727163 CameraExample[11960:4661788] 0x17015b070 Copy assets attributes reply: XPC_TYPE_DICTIONARY { count = 1, transaction: 0, voucher = 0x0, contents =
“Result” => : 1
}
2016-11-09 00:25:39.727222 CameraExample[11960:4661788] [MobileAssetError:1] Unable to copy asset attributes
2016-11-09 00:25:39.727302 CameraExample[11960:4661788] Could not get attribute ‘LocalURL’: Error Domain=MobileAssetError Code=1 “Unable to copy asset attributes” UserInfo={NSDescription=Unable to copy asset attributes}
…….
E ~/tensorflow/tensorflow/contrib/ios_examples/camera/CameraExampleViewController.mm:320] Running model failed:Not found: FeedInputs: unable to find feed output mul
2016-11-09 00:45:45.025627 CameraExample[269:8699] Finalizing CVPixelBuffer 0x17032a1e0 while lock count is 1.
etc…
——————–
I don’t know if it’s related but for some reasons in my frameworks folder, all the files except libprotobuf.a and libprotobuf-lit.a are appearing in red but the app compile without issues. Any ideas why?
Thanks!
Guillaume
I’ve run into the same issue. Any idea what the solution is?
One thing that’s surprising in those logs is that the input name is “mul” (all lower-case) rather than “Mul” as it should be. Is it possible there’s a typo there?
I posted the bug and figured out only afterward it was indeed a typo!! :-S Not used to have a variable name with a cap letter. I’ve tried to delete the comment after I found out my mistake but it was not possible.
Sorry for the trouble and thanks for answering Pete, and thanks again for this great tutorial.
Pingback: Celebrating TensorFlow’s First Year - Contrado Digital
Hi Pete,
Thanks for the great tutorial! I followed similar steps to load a retrained model onto android.
I was just curious though. Do you know what any why these specific variables are set to these numbers?
“`
private static final int INPUT_SIZE = 299;
private static final int IMAGE_MEAN = 128;
private static final float IMAGE_STD = 128;
“`
Thanks
Pingback: The Google Brain team — Looking Back on 2016
Pingback: The Google Brain team — Looking Back on 2016 - 莹莹之色
can you make a tensorflow tutorial for android?
https://www.oreilly.com/learning/tensorflow-on-android Will be updated to work for Tensorflow r1.1 very soon!
Hi Pete, would you please be so kind and help me with one issue that prevents me from moving forward. I have graph with two output layers (final_result_orig – which is basically coming form retraining example,final_result_added – my custom layer) and I am unable to strip/optimize_on_inference it in order to run on android device (on pc it runs fine)
When I run:
bazel-bin/tensorflow/python/tools/optimize_for_inference \
–input=/tmp/output.pb \
–output=/tmp/optimized.pb \
–input_names=Mul \
–output_names=”final_result_orig,final_result_added”
Then in my android application, I get “Session was not created with a graph before Run()” error, and both inal_result_orig,final_result_added is not found.
When I run:
bazel-bin/tensorflow/python/tools/optimize_for_inference \
–input=/tmp/output.pb \
–output=/tmp/optimized.pb \
–input_names=Mul \
–output_names=”final_result_orig”
It works fine, final_result_orig is available and works correctly, however final_result_added is obviously not found and not available for my app to use.
And when I run:
bazel-bin/tensorflow/python/tools/optimize_for_inference \
–input=/tmp/output.pb \
–output=/tmp/optimized.pb \
–input_names=Mul \
–output_names=”final_result_added”
It does not work as well with “Session was not created with a graph before Run()” error, and both inal_result_orig,final_result_added is not found.
I do not understand what I am doing wrong – what could be wrong with “final_result_added”, as it works fine on PC and not android?
Otherwise, thank you very much for cool tutorial.
Hi, Can you please guide me with regard to including the bounding box for the mobile tensorflow application. Where bounding box appears with image label on top of it.
Pingback: Google大脑团队2016年度回顾 - 莹莹之色
Pingback: Google大脑团队2016年度回顾 – 聚合时代
Hi,
Thanks for this nice article, it was of great help to reduce and export my model, in order for it to work on Android.
I’m running tensorflow 1.1.0 on Android, and the optimized and quantized model is working great.
But the mmapped model is raising an exception (java.io.IOException: Not a valid TensorFlow Graph serialization: Invalid GraphDef). I guess it only works on iOS !
Also, I went ahead and tried the eightbit mode, the resulting model is tiny, but it gives very bad results (random is better). I guess that mode will only work for certain models ?
Thanks again
Hi,
First I want to thank you for an absolutely great tutorial, we had a lot of fun with it and won a second place in A.I. hackathon with an app based on your tutorial.
However we are now gearing app this app for the appstore and we ran into some interesting problems. I thought maybe you will know how to solve them.
First whenever we run the graph through graphdef_memmapped it is no longer working on the iOS app, no labels appear and the graph seems to be unrecognised.
Second when we tried to run test to find out if the graph checks out we noticed that the test fail even on the very first unmodified graph.
If we used a model without graphdef_memmapped optimisation then our app works fine, however on some phones it crashes for no reason with no stack trace on Xcode which would indicate that it’s due to the app eating memory too quickly.
Is there something we are missing here? How would you go about solving this?
I’m actually working on some better documentation for this process, so here’s an early draft:
—————-
Most operating systems allow you to load a file using memory mapping, rather than going through the usual I/O APIs. Instead of allocating an area of memory on the heap and then copying bytes from disk into it, you simply tell the operating system to make the entire contents of a file appear directly in memory. One advantage of this is that the OS knows the whole file will be read at once, and so can efficiently plan the loading process so it’s as fast as possible. The actual loading can also be put off until the memory is first accessed, so it can happen asynchronously with your initialization code. You can also tell the OS you’ll only be reading from the area of memory, and not writing to it. This gives the benefit that when there’s pressure on RAM, instead of writing out that memory to disk as normal virtualized memory needs to be when swapping happens, it can just be discarded since there’s already a copy on disk, saving a lot of disk writes.
Since TensorFlow models can often be several megabytes in size, speeding up the loading process can be a big help for mobile and embedded applications, and reducing the swap writing load can help a lot with system responsiveness too. It can also be very helpful to reduce RAM usage. For example on iOS, the system can kill apps that use more than 100MB of RAM, especially on older devices. The RAM used by memory-mapped files doesn’t count towards that limit though, so it’s often a great choice for models on those devices.
TensorFlow has support for memory mapping the weights that form the bulk of most model files. Because of limitations in the ProtoBuf serialization format, we have to make a few changes to our model loading and processing code though. The way memory mapping works is that we have a single file where the first part is a normal GraphDef serialized into the protocol buffer wire format, but then the weights are appended in a form that can be directly mapped.
To create this file, you need to run the `tensorflow/contrib/util:convert_graphdef_memmapped_format` tool. This takes in a GraphDef file that’s been run through freeze_graph, and converts it to the format that has the weights appended at the end. Since that file’s no longer a standard GraphDef protobuf, you then need to make some changes to the loading code. You can see an example of this in the iOS Camera demo app, the `LoadMemoryMappedModel()` function:
https://github.com/tensorflow/tensorflow/blob/master/tensorflow/contrib/ios_examples/camera/tensorflow_utils.mm#L159
The same code (with the Objective C calls for getting the filenames substituted) can be used on other platforms too. Because we’re using memory mapping, we need to start by creating a special TensorFlow environment object that’s set up with the file we’ll be using:
“`c++
std::unique_ptr memmapped_env;
memmapped_env->reset(
new tensorflow::MemmappedEnv(tensorflow::Env::Default()));
tensorflow::Status mmap_status =
(memmapped_env->get())->InitializeFromFile(file_path);
“`
You then need to pass in this environment to subsequent calls, like this one for loading the graph.
“`c++
tensorflow::GraphDef tensorflow_graph;
tensorflow::Status load_graph_status = ReadBinaryProto(
memmapped_env->get(),
tensorflow::MemmappedFileSystem::kMemmappedPackageDefaultGraphDef,
&tensorflow_graph);
“`
You also need to create the session with a pointer to the environment you’ve created:
“`c++
tensorflow::SessionOptions options;
options.config.mutable_graph_options()
->mutable_optimizer_options()
->set_opt_level(::tensorflow::OptimizerOptions::L0);
options.env = memmapped_env->get();
tensorflow::Session* session_pointer = nullptr;
tensorflow::Status session_status =
tensorflow::NewSession(options, &session_pointer);
“`
One thing to notice here is that we’re also disabling automatic optimizations, since in some cases these will fold constant sub-trees, and so create copies of tensor values that we don’t want and use up more RAM.
Once you’ve gone through these steps, you can use the session and graph as normal, and you should see a reduction in loading time and memory usage.
————
If this doesn’t help, drop me an email on petewarden@google.com and I’ll try to dig in further.
Hi Pete,
Great tutorial. I followed all the steps and got the camera app launch using the graph models and labels from my own image identification project (similar to the poets example), but I do not see the labels on my iPhone. I get the following error message. Could you give me some hints on how to get around this. I am using iPhone 5s for testing.
———————
Error message:
———————
[[Node: _arg_Mul_0_0 = _Arg[T=DT_FLOAT, index=0, _device=”/job:localhost/replica:0/task:0/cpu:0″]()]]
2017-04-26 21:21:44.808788: E /Users/amitavabhaduri/amit_devel/proj_openCV/AgShift/tensorflow_iOS/tensorflow/tensorflow/contrib/ios_examples/camera/CameraExampleViewController.mm:352] Running model failed:Not found: No registered ‘_Arg’ OpKernel for CPU devices compatible with node _arg_Mul_0_0 = _Arg[T=DT_FLOAT, index=0, _device=”/job:localhost/replica:0/task:0/cpu:0″]()
. Registered:
Thanks,
Amit
Sorry you’re hitting problems! I think this issue should have been fixed by this change:
https://github.com/tensorflow/tensorflow/commit/2a98029084e8891872a9bd06233d252c58dc0bb6
Let me know if you still see this when you sync to the latest code.
Hi Pete,
The camera app now works for me on my iPhone, but no matter what test image I show to the camera (using live mode or freeze frame), it always predicts a particular label over others. It’s kind of gravitating towards one label with a very high probability. Even if I show the training images, it still does not work well.
On the contrary when I predict the same images using label_image in batch mode it works fine.
Would you know what could be wrong? Have you encountered such behavior?
Thanks,
Amit
Hi Pete,
Is there a way to test ‘mmapped_graph.pb’ in linux? All my debug and test till the quantization step (rounded_graph.pb) worked perfectly. After I generate the ‘mmaped_graph.pb’ and port it over to iOS, I see it strongly predicting only 1 label all the time no matter any image I show to the iPhone camera. It would be great to test this model in linux as well (if possible). Have you seen this kind of behavior? Any pointers?
Sorry to bug you on this, but just so keen to see tensorflow work on iOS for my project.
Thanks,
Amit
Thank you! The Tutorial was great!
Pingback: TensorFlow on Android – Deep Synapse
Thanks for your great explanation on this article. It helps me a lot.
But when i run with my own model (.pb and .txt), tensorflow failed to detect the object.
My app doesn’t crash, the tensorflow just give the wrong result.
Can you help me?
Hi and thanks for the great tutorial. I managed to complete the for Poets tut, but when I cd into tensorflow and run the first bazel command above, I get the following error. I wonder what could be the cause?
ERROR: /tensorflow/tensorflow/core/kernels/BUILD:2140:1: C++ compilation of rule ‘//tensorflow/core/kernels:matrix_solve_ls_op’ failed: gcc failed: error executing command /usr/bin/gcc -U_FORTIFY_SOURCE -fstack-protector -Wall -B/usr/bin -B/usr/bin -Wunused-but-set-parameter -Wno-free-nonheap-object -fno-omit-frame-pointer -g0 -O2 ‘-D_FORTIFY_SOURCE=1’ -DNDEBUG … (remaining 115 argument(s) skipped): com.google.devtools.build.lib.shell.BadExitStatusException: Process exited with status 4.
gcc: internal compiler error: Killed (program cc1plus)
Pingback: TensorFlow on Android – KAYENRE Technology
Hey Pete,
Thx for the write. Very interesting and helpfull.
A question is the pool_3/_reshape op removed by this script?
In other words after I have ran the script would I be able to get this operation on android and run it.
Thx a lot for your help.
So to answer my own question the script does not remove the pool_3/_reshape.
Hi,Peter! I ran mmaped.pb on Android, the exception is :
Not found: memmapped_package://InceptionResnetV2_Repeat_block35_1_Branch_0_Conv2d_1x1_weights
07-28 09:52:21.708: I/native(9233): [[Node: InceptionResnetV2/Repeat/block35_1/Branch_0/Conv2d_1x1/weights = ImmutableConst[dtype=DT_FLOAT, memory_region_name=”memmapped_package://InceptionResnetV2_Repeat_block35_1_Branch_0_Conv2d_1x1_weights”, shape=[1,1,320,32], _device=”/job:localhost/replica:0/task:0/cpu:0″]()]]
Could you post a bug with full details on github.com/tensorflow/tensorflow/issues ? That will help us track down what’s going wrong.
Thank you Peter! The exception is gone. I had a mistake yesterday. It works now. But, it runs on Android so slowly when recognizing the image, even uses memory mapped model. I use the retrained Inception Resnet V2 model. I’m trying to resolve that. Thanks for your reply.
hey Peter, Thanks for this great tutorial. I am running into an issue with running the app in both “tf_camera_example.xcworkspace” and “tf_camera_example.xcodeproj” .
– When running “tf_camera_example.xcworkspace” it tells me :
Assertion failed: (error == nil), function -[CameraExampleViewController setupAVCapture], file /Users/mac/projects/tensorflow/tensorflow/examples/ios/camera/CameraExampleViewController.mm, line 70.
– and When building “tf_camera_example.xcodeproj” it tells
Apple Mach-O Linker Error Group
clang: error: linker command failed with exit code 1 (use -v to see invocation)
Any suggestions please 😦
Hi Pete Warden! How can I show the confusion matrix using this retrained model?
Thanks
Hi Pete, I got a very basic question. Was the original model “Inception V3” or “mobilenet_” in this tutorial? It seemed to me it may be InceptionV3. I think settling this is important to enter the right input_mean and input_std since this has to match how you process the image during _retraining_. I was following the Tensorflow Poet so I didn’t do any of the bazel build stuff, everything is said to nicely contain in the git clone of that tutorial. In the script/retrain.py, I did spot a difference between “inception_v3” and “mobilenet_*”, it is 128 vs 127.5. It is close enough, but not sure if this will degrade accuracy by few %.
Pingback: What is TensorFlow? | Opensource.com – BreakingExpress
Pingback: 学习笔记TF066:TensorFlow移动端应用,iOS、Android系统实践 – 1